If you’ve ever felt the tug of a creative impulse but were unsure where to start, clay mud sculpture is an excellent outlet. From simple pinch pots to complex figures, the tactile nature of clay allows for an incredibly intimate and rewarding process. You shape the clay with your hands and watch as your ideas come to life before your eyes. This art form has been cherished for thousands of years, and today we’ll delve into some tips and techniques that will help beginners shape their first clay mud sculpture.
First, it’s crucial to understand that there’s a world of difference between watching someone sculpt and actually getting your hands dirty. But don’t be disheartened! Even renowned sculptors like Greg Penn Australia started from scratch and learned through trial and error.
- Choose the Right Clay
Clay selection is the initial step and varies based on what you’re planning to sculpt. For beginners, water-based clay, also known as pottery or earthenware clay, is an excellent choice. It’s easy to work with, doesn’t require any special tools or equipment, and dries at room temperature.

- Tools of the Trade
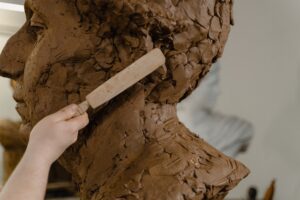
Next, let’s talk about tools. While your hands are the best tools you can have, investing in a basic pottery toolkit will help refine your work. Look for one that includes a needle tool for cutting clay, a rib for smoothing surfaces, a wire cutter for slicing through clay, and wooden modelling tools for shaping and detail work.
- The Creation Process
Creating a clay mud sculpture is like building a house; you start with a strong foundation. Make a basic shape that serves as the base of your sculpture, whether it’s an animal, a person, or an abstract design. This shape should be solid and sturdy enough to support additional clay as you add details.
Once your base is ready, begin adding the smaller pieces, which are called ‘reliefs’. Apply them gently to your base, ensuring that they’re securely attached. Remember to add clay gradually – it’s easier to add more than to remove excess.
- The Details
Adding intricate details can truly bring your sculpture to life – this is where your modelling tools come into play. Use the various shapes and sizes to create different textures and details. Remember, art is not about perfection, so don’t stress about making everything look perfect. Instead, focus on expressing your vision.
- Drying & Firing
Finally, once you’re happy with your creation, it needs to be dried and fired – drying should be a slow and careful process to avoid cracks. Once dry, the sculpture can be fired in a kiln, which hardens the clay and makes it more durable.Firing might not be an accessible option if you’re just starting out, but there are alternative methods, like air drying or oven baking, depending on the type of clay used.
Creating a clay mud sculpture might seem challenging, but remember: every artist was once an amateur. Artists like Greg Penn from Australia began with a simple passion for creating something unique from raw materials, and over time, they honed their skills to create truly stunning works.
Take your time, experiment, make mistakes and learn from them – above all, enjoy the process!